How to Take Perfect Coin Photos with the Coinaikon Visual Lab
Taking great coin photos is the foundation of accurate identification and grading. Whether you're cataloging your collection, getting an AI-powered analysis, or listing a coin for sale, the quality of your images makes all the difference. Coinaikon's Visual Lab is purpose-built for this — it uses real-time computer vision to guide you through capturing both sides of your coin with precision.
This guide walks you through everything you need to know to get sharp, professional-quality coin photos using the Visual Lab.
What Is the Visual Lab?
The Visual Lab is Coinaikon's built-in camera tool that uses real-time coin detection to help you capture the obverse (front) and reverse (back) of any coin. Unlike snapping a regular photo, the Visual Lab actively analyzes your camera feed, detects the coin, and tells you exactly when conditions are right for a perfect shot.
Here's what it does for you automatically:
- Detects your coin in real time using computer vision
- Guides you with directional hints — move left, right, closer, further
- Monitors device stability so you don't capture a blurry image
- Auto-focuses on the coin when it's properly positioned
- Provides haptic feedback so you can feel when alignment is right
- Crops and extracts just the coin from the frame — no background clutter
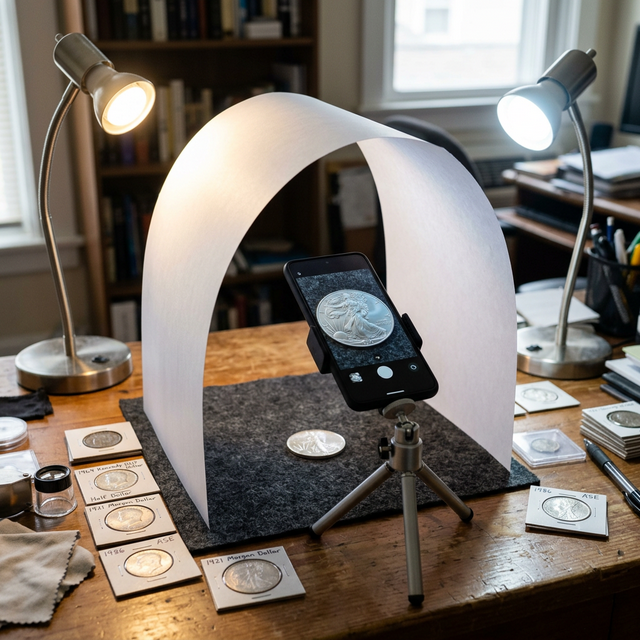
Before You Start: Setting Up for Success Lighting Is Everything
Lighting is the single most important factor in coin photography. Poor lighting causes shadows, glare, and washed-out details that even the best camera can't fix.
Do:
- Use diffused natural light. Position yourself near a window with indirect sunlight. Overcast days are ideal — the clouds act as a natural diffuser, giving you even, soft light with no harsh shadows.
- Use two light sources at 45-degree angles. If you're using desk lamps, place one on each side of the coin at roughly 45 degrees. This minimizes shadows and highlights surface details evenly.
- Use daylight-balanced bulbs (5000K–5500K). These reproduce colors accurately, which matters for copper, gold, and toned coins.
Don't:
- Avoid direct overhead light. A single light directly above creates harsh shadows around raised design elements and washes out luster.
- Avoid flash. The built-in phone flash creates intense specular highlights (bright white spots) that obscure details and misrepresent the coin's surface.
- Avoid fluorescent or warm tungsten lighting. These cast color shifts — green or orange tints — that distort the coin's true appearance.
- Avoid mixed lighting. Don't combine a window with a desk lamp of a different color temperature. Mixed lighting creates uneven color across the coin.
Pro tip: If you only have one light source, hold a piece of white paper or card on the opposite side of the coin to bounce light back and fill in shadows. This simple trick dramatically improves even lighting.
Surface and Background
- Place your coin on a plain, dark, non-reflective surface. A black felt pad or dark cloth works perfectly. This gives the Visual Lab's detection algorithm a clean contrast edge to find the coin.
- Avoid reflective surfaces like glass tables or glossy paper — these create confusing reflections that interfere with detection.
- Avoid patterned backgrounds. Stripes, prints, or textured surfaces can confuse the circle detection and produce false positives.
Hold Your Phone Steady
The Visual Lab monitors your device's accelerometer to measure stability. A stable phone means a sharp capture.
- Hold your phone with both hands if possible
- Brace your elbows against your body or a table
- Consider propping your phone against something stable
- Watch the horizontal progress bar at the bottom of the screen — it acts as an alignment and stability indicator and fills with color as you get closer to the perfect position
Step-by-Step: Capturing Your Coin
Step 1Open the Visual Lab
Tap the Visual Lab tab in the bottom navigation. The camera will activate and you'll see the guide circle overlay on screen.
Step 2Understand the Guide Circle
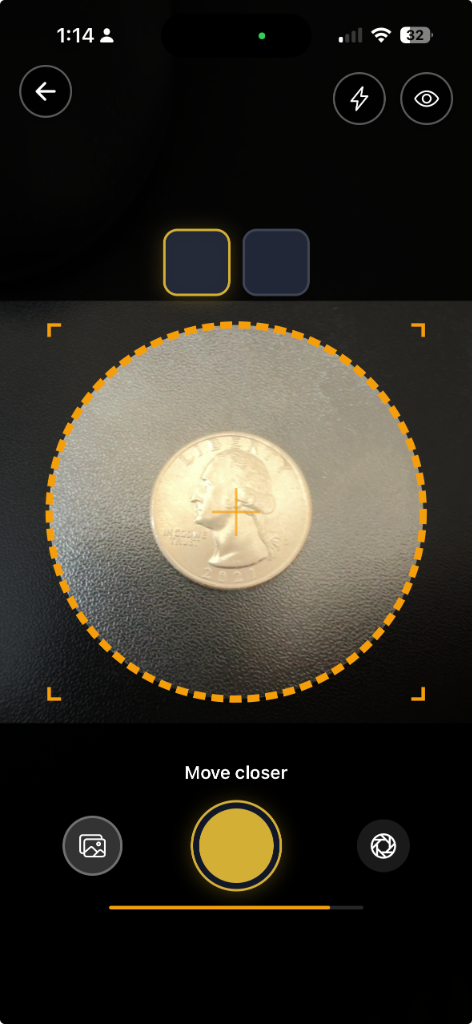
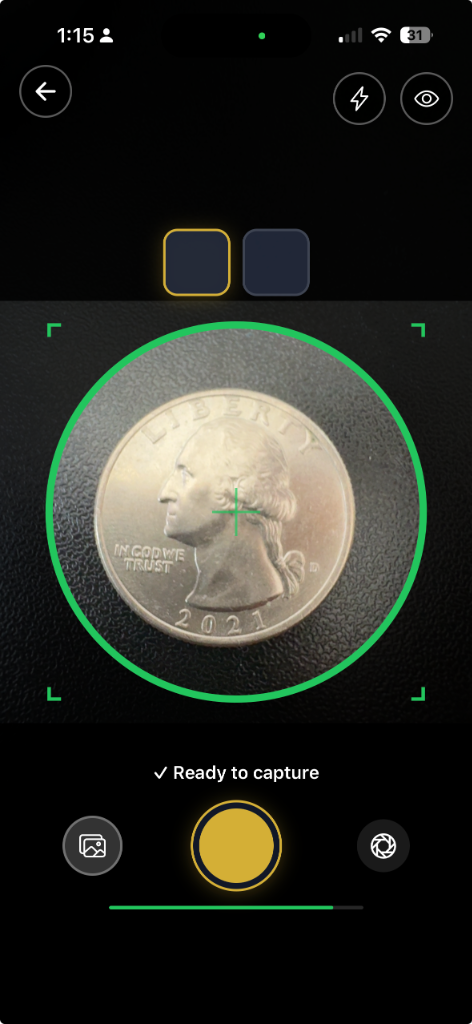
The guide circle is your alignment target. It shows you exactly where and how large your coin should appear in the frame.
| Appearance | Meaning |
|---|---|
| Dashed Amber Circle | Coin detected but not perfectly aligned — follow the directional hints |
| Solid Green Circle | Coin centered, aligned, and steady — ready to capture |
The Visual Lab also features corner brackets to frame the shot and a center crosshair to help you align exactly over the coin's center.
Step 3Position Your Coin
Hold your phone directly above the coin, looking straight down. The camera should be parallel to the coin's surface — tilting creates perspective distortion that affects identification accuracy.
Follow the directional hints on screen:
- "← Move left" or "Move right →" — slide your phone horizontally
- "↑ Move up" or "Move down ↓" — slide your phone forward or back
- "Move closer" — bring your phone closer to the coin (it appears too small)
- "Move further away" — pull your phone back (the coin appears too large)
The goal is to fill the guide circle with your coin. The detection works best when the coin fills roughly 70–100% of the guide circle area.
- A light tap when the coin first enters the frame
- A medium tap as you get close to center
- A strong tap when perfectly centered
- A success vibration when ready to capture
You'll feel it too: The Visual Lab provides progressive haptic feedback as you align:
Step 4Wait for "✓ Ready to capture"
Once your coin is centered and your phone is stable, the dashed amber circle becomes a solid green circle, the horizontal progress bar fills entirely green, and the status message reads "✓ Ready to capture". This ready state activates after the coin has been stable in position for about 1 second.
- The auto-focus has locked onto the coin's surface
- Your hand is steady enough for a sharp image
- The detection has confirmed the coin's position consistently across multiple frames
Don't rush the capture. The brief pause ensures:
Step 5Capture the Obverse
Tap the shutter button when the guide circle is solid green. You'll hear a shutter click and feel a haptic confirmation. The Visual Lab automatically:
1. Extracts just the coin from the camera frame 2. Crops it to a clean 1024×1024 square 3. Removes the background 4. Shows a thumbnail preview in the obverse slot at the top of the screen
The active slot at the top of the screen pulses to show you which side to capture next.
Step 6Flip and Capture the Reverse
Flip your coin over and repeat the process. Position, align, wait for the solid green circle, and tap to capture.
- Give the Visual Lab a moment to re-detect the coin — it intentionally pauses for about 3 seconds after each capture to give you time to flip
- The coin must briefly leave the detection area after capture before the next side can be captured — this prevents accidentally capturing the same side twice
- Re-check your lighting after flipping. Some coins have different reflective properties on each side
Important after flipping:
Step 7Review and Analyze
Once both sides are captured, a review screen appears where you can:
- Scroll between obverse and reverse to inspect each image
- Double-tap to zoom (toggles between 1× and 2× magnification)
- Retake either side individually if you're not satisfied
- Tap "Analyze Images" to send both images to Coinaikon's AI for identification and grading
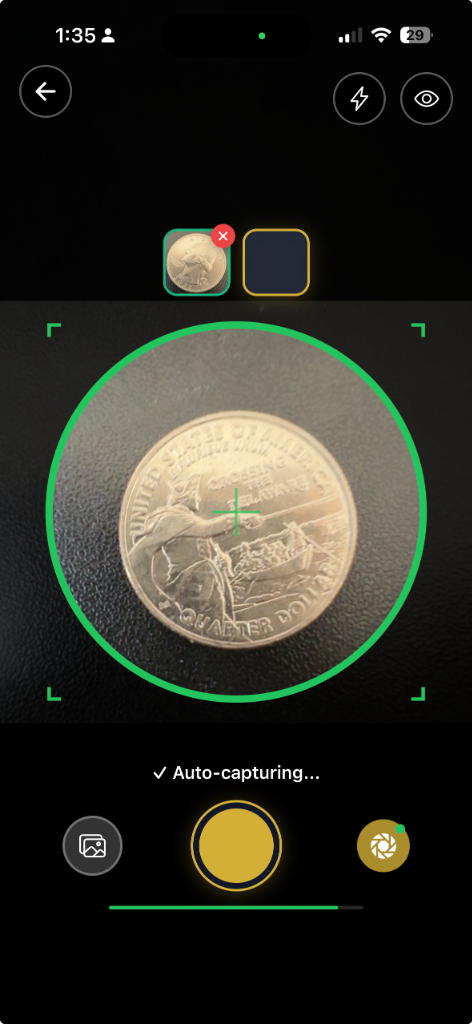
Using Auto-Capture Mode
For a hands-free experience, enable Auto-Capture using the toggle on the camera screen. When auto-capture is on, the Visual Lab will automatically take the photo as soon as conditions are right — no need to tap the shutter button.
This is especially useful when you're photographing multiple coins in sequence, as you can focus entirely on positioning each coin while the app handles the timing.
- It waits for the same "ready" conditions as manual capture (centered + stable)
- After capturing one side, it requires you to remove and flip the coin before it will capture again
- There's a brief cooldown between captures to prevent accidental double-shots
The auto-capture has built-in safeguards:
Using the Torch
In low-light situations, tap the torch (flashlight) icon to enable your phone's LED light. This is different from flash — the torch stays on continuously, so you can see exactly how the light falls on your coin before capturing.
Tip: The torch can create harsh directional light. If you use it, angle your phone slightly so the light doesn't hit the coin straight-on, or diffuse it by placing a thin piece of tissue paper over the flash.
Common Mistakes to Avoid
1. Capturing at an Angle Hold the phone parallel to the coin, looking straight down. Even a slight tilt distorts the coin's shape and makes one side appear larger than the other, which affects AI analysis accuracy.
2. Ignoring the Stability Indicator If the horizontal progress bar at the bottom isn't fully green and the capture fires anyway, you may get a blur warning banner. Retake the shot — a blurry image is worse than no image for grading purposes.
3. Coin on a Busy Background Patterned tablecloths, wooden grain, or textured surfaces confuse the circle detection algorithm. Use a plain, dark, matte surface for reliable detection.
4. Touching the Coin Surface Fingerprints and skin oils can damage a coin's surface and reduce its grade over time. Handle coins by the edges only, or use cotton gloves. This isn't just for photography — it's good numismatic practice.
5. Rushing Between Sides After capturing the obverse, take a moment to properly flip and reposition the coin. The Visual Lab's 3-second cooldown exists for this reason. A rushed flip often results in the coin being off-center or the wrong side facing up.
6. Using Digital Zoom Never use digital zoom — it degrades image quality. Instead, physically move your phone closer to the coin. The Visual Lab's "move closer" hint will tell you if the coin appears too small in the frame.
Tips for Specific Coin Types
- Move your phone closer so the coin fills the guide circle
- These coins benefit most from good lighting since fine details are harder to capture
- Extra steadiness is critical — small movements are more noticeable
Small Coins (Dimes, Small Cents)
- You may need to hold your phone further back
- Watch for the "move further away" hint if the coin exceeds the guide circle
Large Coins (Silver Dollars, Crowns)
- Use diffused light only — proof coins are mirrors and will show every light source as a bright reflection
- Avoid the torch entirely on proof coins
- A light tent or white paper diffuser makes a dramatic difference
Proof and High-Grade Coins
- You may need slightly more light than usual
- Ensure the background is darker than the coin — the detection needs contrast between the coin's edge and the surface beneath it
- The coin detector looks for a clear circular edge, so high contrast between coin and background helps
Dark or Toned Coins
Quick Reference Checklist
Before you capture, run through this checklist:
- Coin placed on a plain, dark, non-reflective surface
- Diffused, even lighting from two sides (no flash)
- Phone held parallel to the coin, directly above
- Guide circle is solid green (coin centered and detected)
- Horizontal progress bar is filled green
- Status reads "✓ Ready to capture"
- Handling the coin by edges only
Start Capturing Your Coins
The Visual Lab takes the guesswork out of coin photography. With real-time detection, guided positioning, and automatic cropping, you get consistent, high-quality images every time — no photography experience required.
Open the Coinaikon app, head to the Visual Lab tab, and start capturing. Your coin collection deserves great photos.
Try Coinaikon for Free
Snap a photo of any US coin for instant AI identification, professional grading, and market valuation. No credit card required.
Start Identifying Coins